Modelowanie GA4 w dbt i Snowflake
Przedstawię przegląd z poradami i wyjaśnieniami, następnie konkretne fragmenty kodu, których możesz użyć, a na końcu omówię kluczowe i podstępne pola surowe, na które warto zwracać uwagę!

Opisane poniżej podejście przetwarza ponad 10 mln zdarzeń dziennie, przechodząc przez 21 różnych (przyrostowych!) tabel. Obliczenie zajmuje od 13 do 15 minut przy magazynie rozmiaru S.
Ogólne wskazówki modelowania
Ogólnie opiera się na podejściu Kimballa z kilkoma drobnymi modyfikacjami i uzupełnieniami. Wolumeny są ogromne, dlatego polecam zrobić to W CAŁOŚCI PRZYROSTOWO.
Poniżej znajdziesz proponowaną architekturę wysokiego poziomu, która sprawdziła się naprawdę dobrze:
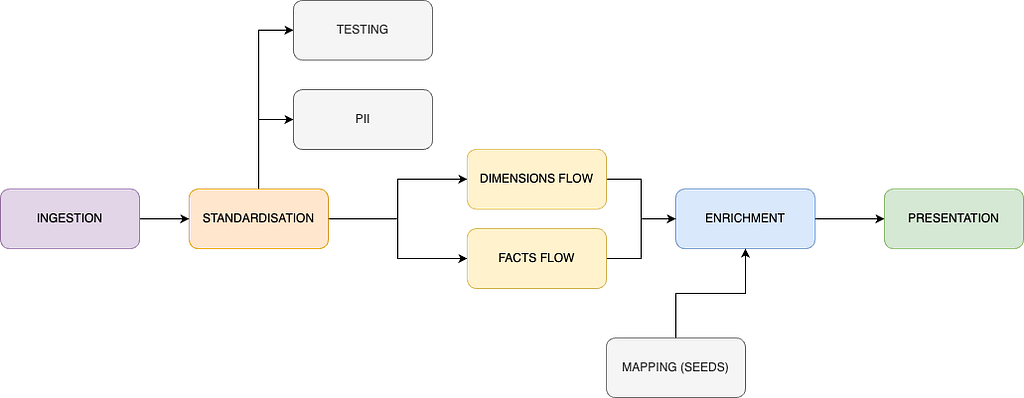
- Pozyskiwanie danych — use one of your choice, for me it is export to S3 and then Snowpipe which works really well.
- Standaryzacja — extremely useful place, where you can flatten your data (likely needed) but also change names of all the custom dimension fields, convert your timestamps and and add some first layer definitions, which will be used later across many models.
- Testowanie — I recommend a separate, tiny model dedicated for testing only, with automated deletion of fields. This is to ensure that neither your compute nor storage costs are skyrocketing (really easy with GA…).
- PII — I recommend a separate place to store PII information along with a retrieval key. Helps with compliance and deletion requests.
- Przepływ wymiarów / faktów → zbuduj pierwsze etapy danych wokół potrzeb interesariuszy. Po standaryzacji znacznie łatwiej będzie tworzyć te struktury pierwszej warstwy. Ciężkie transformacje i joiny polecam umieszczać właśnie tutaj.
- Wzbogacanie + mapowanie → polecam tworzenie tabel mapowań z seedów (np. kanał, kraj, urządzenie lub inne mapowania, gdzie zwykle stosowałbyś długą instrukcję CASE). Mapowania możesz stosować w dowolnym miejscu pipeline’u, zachowując jedno źródło prawdy. Pod względem wydajności świetnie współpracuje to z indeksowaniem Snowflake.
- Prezentacja — this layer depends heavily on the consumers of your data. If it is solely your BI tool — optimise for its read (eg. Tableau extracts struggle over 25GB). If you have external consumers (eg. front end, data shares) — then I recommend you also implement data contracts to ensure integrity of what you’re producing for them. It goes without saying that no heavy joins nor transformations should be happening here.
Pro tipy:
- Once you read GA data as source in your dbt project, make sure you read incrementally from the source as well (custom snippets are provided below). It might prove tough based on your CI approach, but it is feasible — let me know if you want a separate article about setting this up all nice and lean.
- Getting session level data (first and last values) is likely going to be one of the most expensive processing across your pipeline. Separate it such that you bring all required raw values to the session level first and only in the subsequent model enrich the data — works like a charm!
- Plan for failure and reloads — this data has a tendency to be buggy; when coupled with frequently changing marketeers’ requirements, you can be sure of one thing -> you will be reloading this data more often than your other incremental pipelines.
Fragmenty kodu do użycia w wdrożeniu dbt
Definicja SQL modelu testowego
-- setting incremental keys

{%- set lookback_window_in_days = config.get('lookback_window_in_days', default='1') -%}

-- starting table processing

with ga_4_source as  (

    {{ ga_incremental_source_loading('<schema_name>', '<model_name>', this, lookback_window_in_days) }}

)

-- Conditionally delete old records if this is an incremental run
{% if is_incremental() %}
  {{ ga_testing_automated_cleanup('<model_name>', '<schema_name>', '<n_delete_days>') }}
{% endif %}

select

    *,
    {{ dbt_utils.generate_surrogate_key(['hit_id' , 'ga_session_id'
                                        , 'stream_id', 'event_name', 'event_timestamp_converted']) }} as surrogate_key

from ga_4_source

where 1=1 -- this part could be avoided but is added for readability of the incremental block below

    {% if is_incremental() %}

        -- this part allows to do a partial backfill by specifying as a variable
        -- number of backfill days required
        -- accepts --vars '{\"custom_lookback_window_in_days\":\"<number>\"}'")
        -- eg.: dbt run --select <model_name> --vars '{"custom_lookback_window_in_days":"10"}'
        {% if var('custom_lookback_window_in_days',none) %}

        and ga_4_source.event_date_converted > (
                                                        select date_trunc(
                                                                            day
                                                                            , dateadd(day, -'{{ var("custom_lookback_window_in_days") }}'::int
                                                                            , max(t.event_date_converted))
                                                                            ) from {{ this }} t
                                                        )

        {% else %}

        and ga_4_source.event_date_converted > (
                                                        select date_trunc(
                                                                            day
                                                                            , dateadd(day, -{{ lookback_window_in_days }}::int
                                                                            , max(t.event_date_converted))
                                                                            ) from {{ this }} t
                                                        )

        {% endif %}

    {% endif %}
-- additional safety feature limiting result to only 1000 rows - if someone accidentally does a full refresh
limit 1000
Makro GA_TESTING_AUTOMATED_CLEANUP
{% macro ga_testing_automated_cleanup(model_name, schema_name, delete_cutoff_in_days) %}

    {% if target.name == 'prod' %}
        {% set delete_statement %}
            delete from {{ schema_name }}.{{ model_name }}
            where event_date_converted < (select date_trunc(
                                                                day
                                                                , dateadd(day, -{{ delete_cutoff_in_days }}::int
                                                                , max(t.event_date_converted))
                                                                ) from {{ schema_name }}.{{ model_name }} t);
        {% endset %}

        {{ log("Executing: " ~ delete_statement, info=True) }}

        {% do run_query(delete_statement) %}

    {% endif %}

{% endmacro %}
Definicja YAML modelu testowego
Polecam pakiet dbt codegen do generowania dokumentacji YAML. Poniżej znajdziesz wskazówkę do generowania dokumentacji oraz właściwy YAML modelu testowego. Zastosowałem tam wyłącznie kontrakty danych — możesz dostosować konkretne testy do swojego przypadku użycia.
Pro TIP:
Najłatwiej było mi utworzyć plik .sql w folderze analyses z następującą definicją:
-- If you need to create documentation for a new model
-- insert it's name, enable the model (set to true)
-- execute: dbt compile --select <this_file_name>
-- copy paste auto-generated documentation from your terminal
-- if it is too long then use > operator to write output into a file of your choice

{{ config(
  enabled=false
) }}

{{ codegen.generate_model_yaml(
     model_names=['<model_name>']
) }}
version: 2

models:
  - name: <model_name>
    description: "<your_description>"
    config:
      materialized: incremental
      incremental_strategy: delete+insert
      on_schema_change: append_new_columns
      unique_key: surrogate_key
      contract:
        enforced: true
        # lookback parameter defines how many days in the past are we reloading on a daily basis
        # it can be customly changed if required on an adhoc basis
        # custom usage documented directly in the model
      lookback_window_in_days: 1

# here we have to continue with columns definition
# since the list is long and keeps updating - you must handle this on your own
Fragment niestandardowego przeładowania lookback snippet
Możesz wdrożyć ten fragment, aby przy produkcyjnym uruchomieniu przekazywać dodatkowe zmienne, gdy chcesz przeładować dane za dowolną liczbę dni. Zakłada to, że okno lookback w dniach jest podane w konfiguracji YAML modelu (np. lookback_window_in_days: 1) i ma wartość domyślną odczytywaną na początku modelu:
-- setting incremental keys

{%- set lookback_window_in_days = config.get('lookback_window_in_days', default='1') -%}

-- starting table processing

-- here goes your model read logic

-- here we add the incremental clause
{% if is_incremental() %}

        -- this part allows to do a partial backfill by specifying as a variable
        -- number of backfill days required
        -- accepts --vars '{\"custom_lookback_window_in_days\":\"<number>\"}'")
        -- eg.: dbt run --select <model_name> --vars '{"custom_lookback_window_in_days":"10"}'
        {% if var('custom_lookback_window_in_days',none) %}

        and ga_4_source.event_date_converted > (
                                                        select date_trunc(
                                                                            day
                                                                            , dateadd(day, -'{{ var("custom_lookback_window_in_days") }}'::int
                                                                            , max(t.event_date_converted))
                                                                            ) from {{ this }} t
                                                        )

        {% else %}

        and ga_4_source.event_date_converted > (
                                                        select date_trunc(
                                                                            day
                                                                            , dateadd(day, -{{ lookback_window_in_days }}::int
                                                                            , max(t.event_date_converted))
                                                                            ) from {{ this }} t
                                                        )

        {% endif %}

    {% endif %}
Kluczowe / podstępne pola surowe fields
Znacznik czasu zdarzenia
event_timestamp jest podawany w mikrosekundach, dlatego trzeba go jakoś sparsować, aby był zgodny z funkcjami Snowflake. Poniżej przykład konwersji do milisekund:
to_timestamp_ntz(event_timestamp / 1000, 3)
Dzielimy przez 1000, aby uzyskać wartość w milisekundach, i parsujemy „3” jako drugi argument, informując Snowflake o skali wartości numerycznej, aby poprawnie ją sparsować. Dla sekund użyj „0”, a dla nanosekund „9” (dokumentacja Snowflake — współczynnik skali).
Na koniec możesz chcieć przekonwertować strefę czasową — pierwotnie event_timestamp jest podawany w UTC.
Identyfikator użytkownika
user_pseudo_id, dostarczany przez Google, zawiera dane osobowe. Możesz go zanonimizować za pomocą sha2() lub innego algorytmu haszującego. Zastanów się dwa razy, zanim zamodelujesz te dane — kiedy, gdzie i do czego je wykorzystasz. Nie muszę przypominać o wysokich karach za niewłaściwe obchodzenie się z danymi osobowymi użytkowników!
Zaangażowanie użytkownika
engagement_time_msec to pole dostarczane przez Google. Możesz chcieć przekonwertować je na sekundy, na przykład:
ceil(engagement_time_msec::int / 1000)
Google śledzi rzeczywisty czas zaangażowania użytkownika — każde oderwanie od karty, przeniesienie aplikacji w tło itp. zatrzymuje licznik i wysyła wartość do silnika GA. Szczegółową dokumentację znajdziesz tutaj.
Kontakt
Dziękuję za przeczytanie. Podoba Ci się przekazana wiedza, ale brakuje czasu lub kompetencji, aby uporządkować analytics engineering? Sprawdź moje dane kontaktowe.
GA4 modelling in DBT & Snowflake został pierwotnie opublikowany na Lortech Solutions Blog na Medium, gdzie czytelnicy kontynuują rozmowę, podkreślając i komentując ten artykuł.